![]()
This module is available only in EVS-PROand MVS
General Module Function
The Animator module is now tightly coupled with your application. It is aware of those modules and their associated parameters in the application. It allows you receive the values or set the values in each module without the need for typing.
Module Input&Output Ports
Animator has no input or output ports.
IMPORTANT NOTE: Be sure to TURN OFF "Animate Viewer" in the Animator module if you're controlling fly_through with the Animator.
Module Control Panel
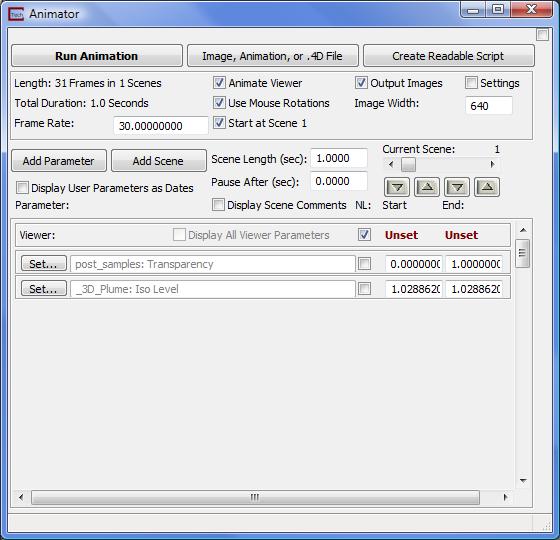
The control panel for Animator is shown in the figure above. Please note that the example figures in this help topic show the Animator with settings for a specific application. Each of the user parameters is discussed below.
Run Animation: This button causes the Animator to run, controlling all modules, the viewer and creating images or an animation file (e.g. avi, hav, etc) as specified.
Image, Animation, or .4D File: This button opens a browser allowing you to specify the type of output desired and the folder. The suffix chosen determines the type of output (image sequence, animation or 4DIM file). For images you specify an image "base" name to create a sequence of image files. Any supported image file type may be specified though we strongly recommend using PNG (.png). The name specified should be of the form base.png (or other suffix such as .bmp, .tif, .tga, etc.) and the files created will be base0001.png through base0101.png (for 101 total frames).
Create Readable Script: This button causes the Animator to run, controlling all modules, the viewer and creating images or an animation file (e.g. avi, hav, etc) as specified.
Length: is a text output telling you the total number of frames and scenes in your animation.
Total Duration is the duration of the animation in seconds.
Animate Viewer is a toggle which determines if the Viewer will be controlled in the animation.
Use Mouse Rotations: When the toggle is on, each scene ending viewer position can be set by the actual view as determined by your mouse rotations and/or Az-El selections. BE SURE TO SET CAMERA AUTO-NORMALIZE TO NONE.
Output Images / Output Animation / Record 4DIM is a toggle which determines if an animation file will be created during playback. Turn this off during test playbacks if you just want to watch the progress in the Viewer. The name of this toggle depends on the type of file selected for the image or animation.
Image Width is a type-in that sets the basic size for images or bitmap animations. Unless overridden in Settings, the height is determined by the aspect ratio of your Viewer.
Settings is a toggle which opens the window below:
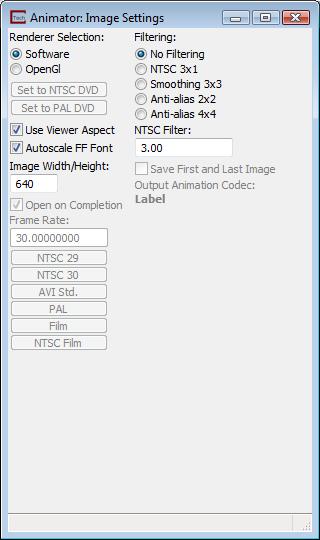
a) Renderer Selection chooses the method for creating images for image output or integration into an animation file.
Software uses C Tech's software renderer and
OpenGL uses your graphics card's OpenGL renderer
b) Filtering selects any filtering options for each image frame. For computer playback No Filtering is the most common option and for output to DVD (interlaced) or other television video, the Anti-alias 4x4 option is best.
c) NTSC Filter is a type in which controls the "blurring" for the 4x4 option.
d) Set to NTSC DVD is a button which sets the recommended settings for NTSC DVD output.
e) Set to PAL DVD is a button which sets the recommended settings for PAL or SECAM DVD output.
f) Use Viewer Aspect will cause the Image Height to be generated based upon the value in the Image Width field and the Aspect Ratio of the Viewer. If this toggle is not selected an Image Width and Image Height should be set.
g) Autoscale FF Font this toggle will cause all Forward Facing text to be scaled according to the size of the Viewer.
h) Image Width & Height: These type-ins specify the size of the image file to create if an image type (not .4d) file name is specified with the "Image or 4D file" button (these are connected to the same type-ins in the main window). If the Use Viewer Aspect toggle is selected the Height field will be generated based upon the Image Width field and the Aspect Ratio of the Viewer.
i) Open on Completion is a toggle which will cause the animation to open in Windows Media Player (or your default application) upon completion.
k) Save First and Last Image is a toggle which will save the first and last image. When an animation format is selected (e.g. AVI) each frame of the animation is not saved. This toggle causes the first and last frames to be saved. Often in video editing software (e.g. Adobe Premier Pro) it is useful to have the first and last frames if you want to create a pause before and/or after the animation sequence.
l) Frame Rate: This type-in specifies the frame rate in frames per second for the animation. A lower frame rate creates a smaller but jerkier animation. For playback on computers, typical frame rates are 10-20 frames per second. The buttons below set commonly used frame rates. (this is connected to the same type-in in the main window)
m) Output Animation Codec: This shows the selected default CODEC for the type of animation file you've created. There are four supported bitmap animation file types which are AVI, WMV, MPG (MPEG), and HAV.
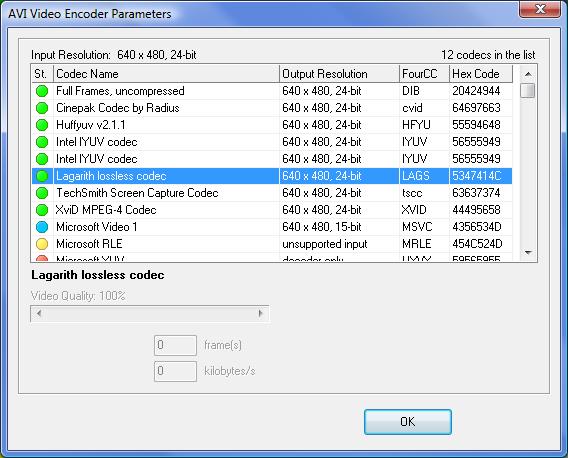
The AVI parameters window has the most options. The first thing to take notice of is the colored circles on the leftmost column. Only those colored GREEN are fully supported. Blue and yellow may work but will likely have issues and red is not recommended. With each CODEC type, additional options may be available.
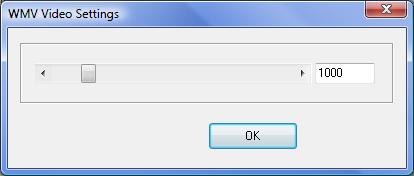
The Windows Media Video (WMV) CODEC has only one parameter which is not labeled (this is a Windows generated panel). The parameter is bit rate which defaults to 1000 and has a max value of 8,000. Higher values give higher quality and a larger file size.
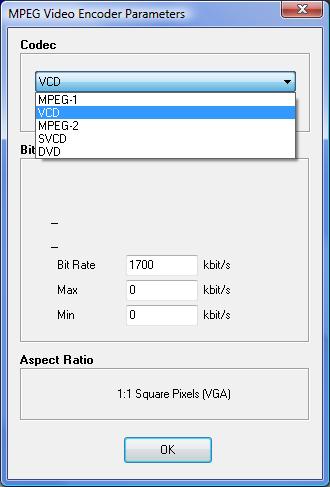
The MPEG encoder parameters provides several useful options including DVD.
The HAV format has only two types and the ability to set the key frames.

to use from among those installed on your computer. Only a few CODECS are included with windows. Others are available with various software packages. This tries to default to TechSmith Screen Capture Codec, or, if that doesn't exist, to the HuffYUV codec (both are lossless). If neither exists, the first one in the list will be selected.
11) Frame Rate: This type-in near the top left corner specifies the frame rate in frames per second for the animation. A lower frame rate creates a smaller but jerkier animation. For playback on computers, typical frame rates are 10-20 frames per second.
12) Start at Scene 1 is a toggle which forces Run Animation to start at your first scene. Otherwise it begins at the Current Scene as specified in the slider.
13) Image Width & Height: These type-ins specify the size of the image file to create if an image type (not .4d) file name is specified with the "Image or 4D file" button.
[create_animation_panel4.jpg]
14) Add Parameter: This button causes a window to appear where you can specify all available parameters and properties for each controllable module in your application. The window is shown above.
15) Add Scene: This button appends a new scene to your animation. The initial values for every parameter will be obtained from the current values in your application.
16) Scene Length sets the length of the current scene in seconds. This value multiplied by the frame rate equals the total number of frames for the scene.
17) Current Scene is a slider to specify the scene for which you want to see or set values.
18) Pause After sets a pause duration in seconds after the current scene. This is an efficient way to create a pause in your animation.
19) Display User Parameters as Dates is a toggle intended for temporary use to see any parameters that represent dates as a date format.
20) Display Scene Comments: This is a toggle that opens a large type-in that lets you describe the purpose or theme of the scene. These comments are included in the Readable Script. This is shown in the figure above.
21) NL are toggles for each module parameter that determine if the interpolation of the Start and End values should be non-linear. The NL toggle Non-linear interpolation provides "soft" acceleration when moving or rotating objects (or interpolating any other feature). Instead of linear interpolation, a SINE function is used so the slope (rate of change of the parameter) is zero at the beginning and end. Note: By default, this is on for the Viewer since the behavior (in our opinion) is advantageous for rotations and other Viewer manipulations, however for all other parameters it is off by default.
22) Start: The Start type-in is the initial parameter value for the sequence.
23) End: The End type-in is the final parameter value for the sequence.
22)
![]() Down Button This button transfers the current value of all animation parameters in each referenced module into the Start or End values of the Animator. In other words, this lets you set how all parameters for the Start or End of the current Scene.
Down Button This button transfers the current value of all animation parameters in each referenced module into the Start or End values of the Animator. In other words, this lets you set how all parameters for the Start or End of the current Scene.
23)
![]() Up Button This button transfers the current Start or End values in the Animator to all animation parameters in every referenced module. In other words, this lets you see how your Viewer will look at the Start or End of the current Scene.
Up Button This button transfers the current Start or End values in the Animator to all animation parameters in every referenced module. In other words, this lets you see how your Viewer will look at the Start or End of the current Scene.
© 1994-2018 ctech.com