Krig_2D is a module that reads an EVS .apdv (analyte (e.g. chemistry)) data file. It uses Kriging, a geostatistical method for estimating the concentrations at points on a "regular" grid.
Notice that we spell Krig_2D with an underscore, even though it appears as Krig 2D in the Network Editor. Krig_2D's real spelling is with an underscore. The Network Editor replaces underscores with spaces.
Instance Krig_2D
a. With the mouse, point to Krig_2D in File library.
b. Press and hold down the left mouse button. This selects the module, turning it blue.
c. Keeping the button held down, move the mouse pointer into the the Application window workspace. This action is called dragging.
d. When we have dragged Krig_2D into the Application window , two things happen: an outline of Krig_2D appears; and the Application window 's title bar and frame turn pink, indicating that the Application window is where the module will be placed if we release the mouse button.
e. If the module is not dragging, release the mouse button and try again.
f. Release the mouse button.
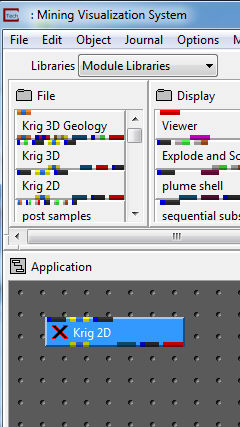
The Application window should now look something like this:
Note that Krig_2D is preceded by an X because the module has not yet run.
Repositioning Krig_2D
We can easily reposition modules in Application window .
To reposition Krig_2D in The Application window :
a. With the mouse, point to Krig_2D in The Application window . Do not point to the module's ports (the colored rectangular strips at the top and bottom of Krig_2D).
b. Holding down the left mouse button, drag Krig_2D to a new position in the Application window , then release the mouse button.
Real time execution
EVS executes some aspects of our application as we build it. This helps us prototype our application and verify the work we have done. Krig_2D includes a user interface for specifying a .apdv (analyte (e.g. chemistry)) filename and provides many user adjustable parameters. When we instance Krig_2D into the Application window, one thing that happens is that Krig_2D's user interface becomes selectable in the Module menu, located at the top of the Network Editor.
Select the Krig_2D pull-down command from the Modules pull-down menu in the Network Editor window.
Krig_2D's main user interface appears.
We won't select a file or modify any parameters... yet.
Finding modules usingObjectFinder
EVS has a tool called an object finder that helps you to find any module in the libraries.
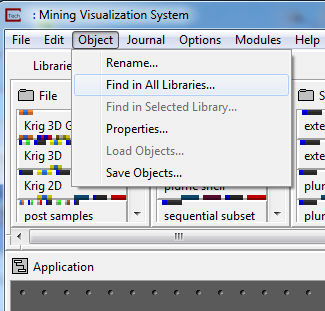
click on the Find in All Libraries in the Object button as seen above. Then, Object finder will come out.

Now let's search for the plume_area module. We'll be using it a bit later in this workbook. You don't need to remember the module name exactly. You can type letters that are in the name of the module and type * at the end.
For example, if you type plu* and hit the Find button, you'll see all the modules that begin with "plu". If you wanted to find them by searching for "lum" you would need to type "*lum*" This search is not case sensitive.

Notice that there are many modules with "plu" in the name. Although plume_area only shows up in two libraries, depending on the module name you type, you may notice that there are three different libraries. They are:
Deprecated_Modules
Module_Libraries and
Sorted_Alphabetically
Generally you should NEVER use deprecated modules. These are kept in this library for backwards compatibility, but these modules have been superceded by newer modules and will eventually be dropped.
The other two libraries (b & c) are identical in content. These include all of the modules for the version you are running (e.g. MVS, EVS-PRO, EVS-Standard), but they are listed in the sublibraries (e.g. File, Display, etc.) in a different order. Module_Libraries are listed (sorted) by frequency of use and is the recommended (and default) library. Sorted_Alphabetically are sorted alphabetically with the exception that modules with capitilized names are listed first.
Select the second item in the list (Module_Libraries.Subsetting.plume_area) and hit the Show button.

This will cause plume_area to be highlighted.
Once you click on Show you can close the Object Finder window. You should see plume_area highlighted as shown below:

In this particular case, plume_area was the fourth module down in the Subsetting sub-library which required it to scroll down to display the module.
© 1994-2018 ctech.com