![]()
General Module Function
Read_Image reads an image file of a specified type and converts it into an 2D uniform field. It can optionally perform some basic image manipulation upon the read image. It also automatically looks for a world file or GCP file associated with the image in the same folder. Since this is done automatically, the world file name must conform to industry standards.
The naming conventions for the world file require that the world file must have the same base name and the extension must be the first and last letter of the suffix followed by a 'w'. For example:
Image World file GCP file
801022_ot.jpg 801022_ot.jgw 801022_ot.gcp
coasth.png coasth.pgw coasth.gcp
sitecrop.tif sitecrop.tfw sitecrop.gcp
If you world or gcp file name does not conform to this standard, you need to rename the file.
World Files have six lines that should contain the following information:
FIRST LINE: The dimension of a pixel in map units in the x direction
SECOND LINE: 0 (the rotation factor for rows - in this case none)
THIRD LINE: the rotation factor for columns- in this case none)
FOURTH LINE: The dimension of a pixel in map units in the y direction. The y-scale is usually the negative value of the x-scale.
FIFTH LINE: The x coordinate of the center of the upper-left pixel in map units.
SIXTH LINE: The y coordinate of the center of the upper-left pixel in map units.
WARNING: If the image portion of a georeferenced file is cropped or resized, the corresponding World file must be appropriately edited.
The world file information is passed to the texture_map module to georeference the image mapped on objects.
If you do not have a World file or GCP file, but are able to identify the coordinates (real world x-y) associated with objects (pixels) in your image, click on the EditGeoreferencing button to open the standalone utility program Georeference Image which can create world files or .gcp (ground control point) files for images.
Module Input Ports
Read Image has no input ports. It obtains the input data by reading a file with a file browser
Module Output
Read_Image has one output port. The port passes the mesh and data components to other modules which accept uniform field data types. Data passed from Read_Image is usually either viewed with DisplayImage or sent to modules in the Subsetting and/or Processing Libraries. The x and y nodal dimensions of the field will equal the pixel dimensions of the image and the values assigned each node are obtained from the RGB value of each pixel. The second port is used to send the 2D uniform field data directly to the viewer for rendering.

Module Control Panel
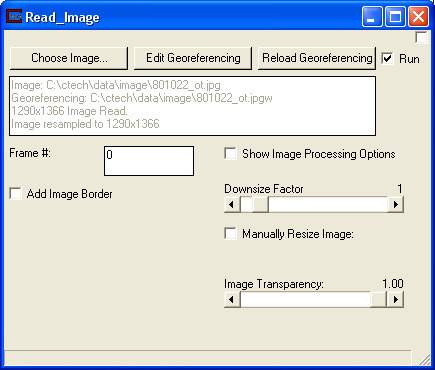
The user interface (shown above) allows selection of a file, a toggle for reversed scan line images, and various options for choosing image filters to apply as the image is read.
The Manually Resize Image toggle makes two inputs available to resize the image to any specified resolution as it is read.
The Frame #: input field is used for reading from animations. An animation file can be specified (such as a HAV or AVI file), and a specific frame read as the image.
The AddImageBorder toggle when selected will make additional controls visible for:
Border Color: This button allows you to set the color of a border applied to the image. This border is useful when your image is smaller than your object's (being texture mapped) extent. This prevents ugly streaking.
Border Transparency: Allows the border to become transparent. Transparent texture maps make the surface (or object) disappear or become transparent.
Border Size: Larger borders are necessary if the object being texture mapped has coarse resolution. You can tell if you need a large border if the border appears saw-toothed.
ImageTransparency: Controls the transparency of the entire image. Transparent texture maps make the surface (or object) disappear or become transparent.
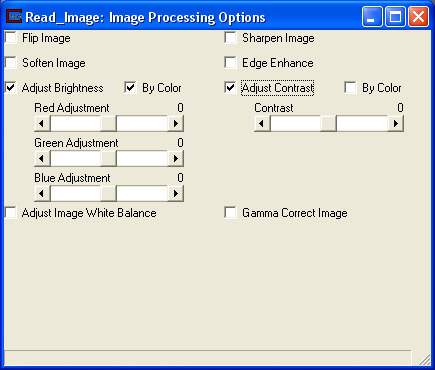
The ShowImageProcessing Options toggle when selected will open an addition window shown below with additional controls.

The Flip Image toggle when selected will invert the image about the x axis, i.e. in the vertical direction. The renderers assume that the image origin is at the lower left. Use this toggle if the image is rendered upside-down.
The Soften Image toggle makes the image smoother by applying low intensity pixel averaging.
The Sharpen Image toggle increases the visibility of details on the image.
The Edge Enhance toggle enhances the edges of the objects and discards other image information.
Sliders are available to adjust the image brightness, contrast, or gamma correct the image. When Adjust Brightness or Adjust Contrast is selected, a new toggle will appear beside the first labeled By Color. This allows the image brightness or contrast to be adjusted on a per-color basis.
File types: The following image formats (with extensions) are currently supported:
* Portable Network Graphics (png)
* Windows Device Independent Bitmap 8/15/24 bit (bmp, rle, dib)
* JPEG Joint Photographic Expert Group, JFIF 1.02 (jpg, jpeg, jif, jiff, jpe, J)
* GIF Graphics Interchange Format (gif, giff)
* TGA Truevision Targa 8/15/24/32 bit (tga)
* TIFF Tagged Image File Format (tif, tiff)
* XPM X-Pixmap (xpm)
* BAY Bayer Image (bay)
* FLC AutoDesk FLIC/FLIC-Pro, 8 bit (fli, flc)
* PCX Zsoft Paintbrush, 8/24 bit (pcx)
* PNM Portable Image 8/15/24 bit (pnm, ppm, pgm)
* RAS Sun Raster Image 8/24/32 bit (ras, sun)
* RGB Silicon Graphics Image 8/24/32 bit (rgb, rgba, bw, sgi)
AnimationFile types: Single frames can be read from any of the following animation formats (with extensions):
* HAV High Quality Audio Video (hav)
* AVI Windows Audio Video Interleaved (avi)
* MPEG Motion Pictures Expert Group, Version 1 (mpg, mpeg, mpe, m1v)
© 1994-2018 ctech.com