![]()
The module for the player integrated in C Tech software is:
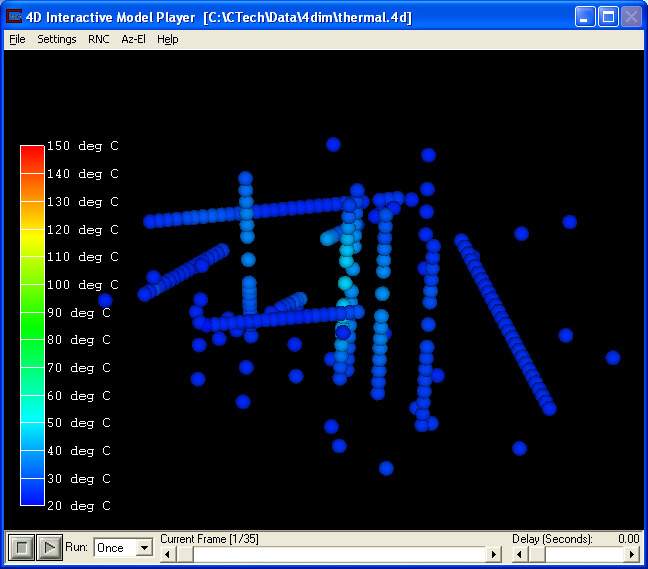
The Playback _4DIM module and the stand-alone 4DIM Player are identical in functionality with very minor exceptions. The players include an integrated C Tech Viewer with many of its features. Mouse interactions are nearly identical to the Viewer's. The bottom of the player window includes script controls and more.
After loading the file specified in the previous topic, the player's window should look like:

Shortcuts
There are a few keyboard shortcuts worth noting. These will give you quick control over the player.
CTRL-F sets the player to FULL SCREEN mode. This is not equivalent to the maximize button in the upper right corner since this removes the normal borders.
With the player as the active window, ESC(ape) exits Full Screen mode
CTRL-H toggles the Auto-Hide mode.
The VCR type buttons on the player panel allows you to run or pause the selected scipt. The function of each button is:
![]() Stop: Stop script from playing.
Stop: Stop script from playing.
![]() Pause: Pause script.
Pause: Pause script.
![]() Play: The play button will open the Choose 4DIM View window. This window selects the current script to be played by the 4DIM player. There are standard scripts that can be played with every 4DIM or complex scripts that can be created and bundled for specific 4DIM's. If a 4DIM has been paused while playing a script this button will instead resume the playing of the script.
Play: The play button will open the Choose 4DIM View window. This window selects the current script to be played by the 4DIM player. There are standard scripts that can be played with every 4DIM or complex scripts that can be created and bundled for specific 4DIM's. If a 4DIM has been paused while playing a script this button will instead resume the playing of the script.
Start by hitting the Play button.Select "Play Each Frame" from the Standard Script Library and then select the "Play Script" button.Notice that the animation plays from the beginning to the end only one time. There are options to change this behavior.
The Run option menu allows for specifying three different ways of playing the animation:
Once displays the script one scene at a time.
Cycle will display the script one scene at a time, when the script is complete it will repeat this process.
Bounce also displays the script one scene at a time, however, when the script is complete it will then play the scenes in the reverse order. It will continue to bounce until stopped.
Change to the Cycle option and Play again. Note now that the animation runs until you Pause or Stop. In this mode it runs from start to finish and then resets to the beginning and runs again.
Change to the Bounce option and Play again. In this mode it plays from start to finish and then from finish to start and so on.
The Current Frame slider provides a visual display of the current frame, and more importantly provides a direct method of examining each frame. The slider button (moving square) can be dragged forward or backward to advance or retreat the current frame in real time.
Now let's control the animation using the slider. You should have noticed that it moved when you play with any of the modes above. Press Stop (or Pause) and "click and hold" on the square moving button on the slider. As you move the slider, the animation responds by displaying the frame that you specify by your motion.
You can use the Delay slider to slow down the replay. The slider controls the amount of time between frames in seconds. You can set the amount of time from one-hundredth of a second to two seconds.
Now that you know how to play the animation, the real fun begins.
© 1994-2018 ctech.com